We would like to inform you of a critical update concerning our mobile software development kit (mSDK)
when used in conjunction with the newly released iOS SDK 18 and Xcode 16.
It has come to our attention that applications compiled using these latest tools
alongside any version of our mSDK prior to 6.14.0 may experience crashes due to a UI-related issue.
Technical Insight:
The root cause of this problem lies in a change made by Apple to their internal implementation,
which affects how views are initialized within the application,
leading to repeated initialization and subsequent crashes.
Resolution:
This fix is incorporated into our mSDK release, version 6.14.0.
For detailed information on this update, please refer to the release notes provided.
Recommendation:
To take full advantage of the newest features and essential bug fixes,
we strongly advise adopting mSDK version 6.14.0 as it is designed to work seamlessly with iOS SDK 18 and Xcode 16 or above.
Should you continue using an older mSDK version with these latest tools,
you may encounter stability issues which can be avoided by updating to mSDK version 6.14.0.
Already published applications are not affected.
Mobile SDK
Mobile SDK makes it easy to accept payments in your mobile app on iOS and Android platforms.
This guide shows you how to integrate in-app payments into your mobile shop or build a wallet-style app. The Mobile SDK takes care of the complexity: it routes the payment correctly to your account and handles the interaction with the payment gateway.
Integration scenarios
NOTE: When you are just getting started with your project, we suggest trying our checkout screens to instantly have a full-fledged checkout experience. You can always come back and build your own payment forms later.
How it works in three main steps
Send the payment info
using the Mobile SDK
Use the Checkout ID to send the payment info. You can use our Checkout screens or create your own payment form.
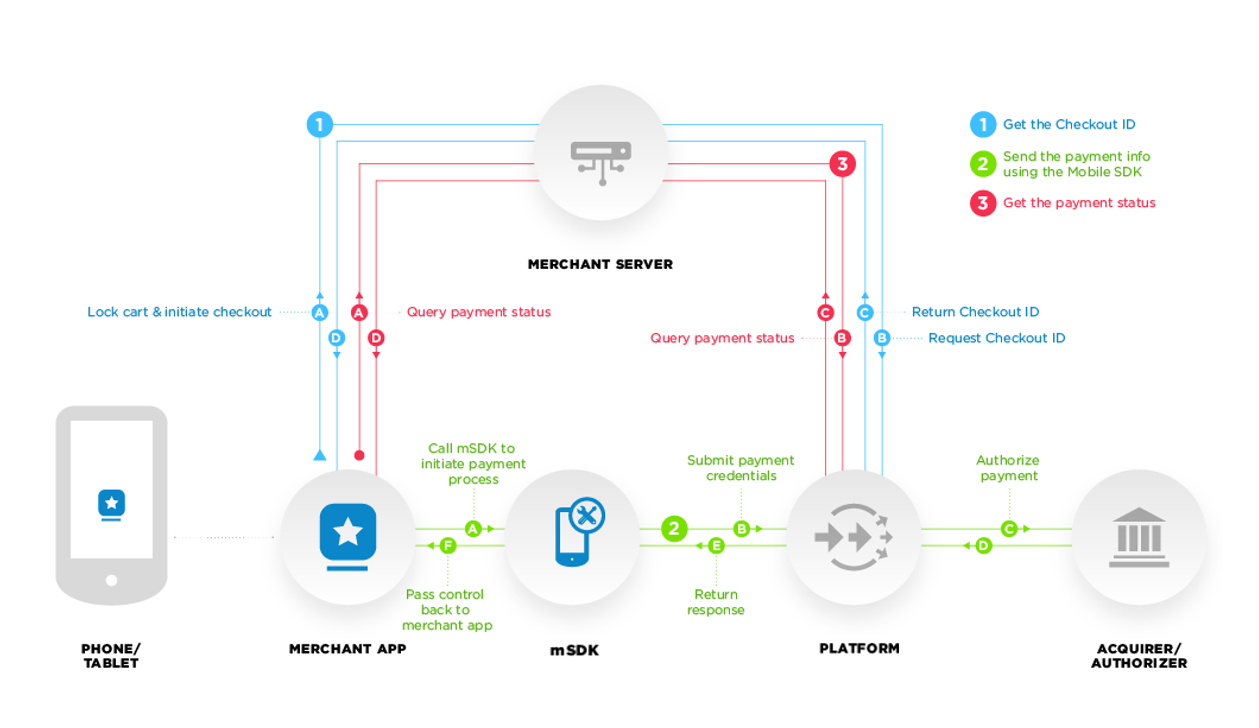
As you can see on the diagram, Merchant Server communicates with your app and our Server (Platform) on steps 1 and 3.
To integrate the SDK you need to expose your backend API first. We did not include this functionality to the SDK due to security reasons. Your authentication details are required for these steps, they should be stored on your server, not in the app.
Step 1. Get the Checkout ID in order to make the payment using the mSDK
Step 2. Send the payment info using the Mobile SDK
If you are using the SDK with our Checkout Screens:
If you are using the SDK with your own UI:
Step 3. Get the payment status
Key concepts
Checkout ID
The checkout ID is a string returned by your application from your server to represent a unique transaction identificator. This should not be reused; a new checkout ID should be generated for each new customer transaction. Your server is responsible for generating the checkout ID.Your client is responsible to obtaining the checkout ID from your server and initializing the Mobile SDK.
Token
The token is a string returned by the Mobile SDK to represent the stored payment details. Mobile SDK uses this string to obtain the detailed payment information to allow making one-click payment. Your server is responsible for getting and storing the token.Your client is responsible for obtaining the tokens from your server and providing them to the Mobile SDK.
Synchronous & asynchronous payments
To pay with a credit card (that is not enrolled with 3D Secure program) the shopper needs to fill app's payment form with card details. Then he confirms purchase e.g. by clicking "Buy" and the transaction is submitted immediately. It is a synchronous workflow.
If the card is enrolled with 3D, after purchase confirmation the shopper should be redirected to the issuer page to perform the 3D authorization. The transaction will be processed only after successful authentication. It is a typical example of asynchronous workflow. Another example is online banking transfers, in this case customer may need to pass account authentication on issuer bank page (e.g. SOFORT Banking).
Integration Support
We want to ensure our customers understand that we exclusively provide support for native integrations. This means we offer comprehensive support for iOS native and Android native integrations only.
Why Hybrid Integrations Are Not Supported: Hybrid integrations, which combine elements of both native and web technologies, often result in performance and compatibility issues. These can affect the user experience and the reliability of payment processing. By focusing solely on native integrations, we can ensure optimal performance, security, and a seamless user experience for your mobile applications. This approach allows us to provide the highest level of support and maintain the integrity of our payment processing solutions.
Privacy policy for the app when integrating the Android Mobile SDK
The recommendation for all merchants is to invoke the Fraud prevention, security, and compliance teams and adjust the privacy policy. You must be transparent in how you handle user data (for example, information collected from or about a user, including device information).
That means disclosing the access, collection, use, handling, and sharing of user data from your app, and limiting the use of the data to the policy compliant purposes disclosed. The following fields might be considered as sensitive. This information might be collected when making a 3D Secure 2.x authentication during the payment.
- Advertising ID
- Latitude
- Longitude
- DeviceId (not used in API level 29 or higher)
- SubscriberId (not used in API level 29 or higher)
- Group Identifier Level
- Phone number
- Serial number of the SIM (not used in API level 29 or higher)
- WiFi Mac Address
- Hardware address of the local Bluetooth adapter
- Array of bonded(paired) Bluetooth Device MAC address
- Array of bonded(paired) Bluetooth Device alias
- String that uniquely identifies this build
- Hardware serial number (not used in API level 29 or higher)
- Installed Applications
Privacy policy for the app when integrating the iOS Mobile SDK
iOS SDK contains the privacy info manifest file inside the bundle which describe the use of required reason API and data use.
Following are the Privacy Accessed API Types
- File Timestamp
The recommendation for all the merchants to create privacy info manifest file in the app bundle if using additional required reason API or data use.
Mobile SDK and PCI Compliance
Our mobile SDK empowers you to create native applications for both iOS and Android platforms. The mSDK is designed to facilitate seamless payment integration between your mobile application and our hosted platform endpoint for payment processing. It is important to note that the mobile SDK itself is not a hosted service for processing card data.
Scope of PCI DSS AOC: Our PCI DSS Attestation of Compliance (AOC) covers hosted products and solutions, such as COPYandPAY and Server-to-Server.
Client Environment: This certification does not extend to any libraries, products, or solutions installed in your environment, including the mobile SDK.
If interested in checking supported brands list, then please vist the supported brands page.